November 2, 2016 Update: "Special Deal" with over 100 new FACS resources reopened for Nov 2016-Oct 2017!
The one area of the FACS classroom which takes the most time and creates the most headaches would have to be the kitchens, so this is where I will start. The way I organize my kitchens revolves around one concept: color-coding. Color-coding is pervasive throughout all of my classroom management systems, as we’ll see later on, but nowhere is it more obvious than in the cooking labs.
To begin with, each kitchen is assigned a different color. This is by no means a new idea, as I’ve seen many schools organized this way. Oddly, two of the three schools I’ve taught at did not have such a system in place when I started there. The beauty of the color-coded kitchens is that you know where everything belongs, and it’s easy to communicate which station you’re referring to when giving directions.
Make it Obvious
There are several things I do to make the color-coding system in the kitchens obvious. First, each kitchen has a sign declaring that kitchen’s color – these lovely posters are available at
LearningZoneExpress.com, my favorite source of FACS posters, etc.
Mini Color Posters, #9113
(also available in different languages!)
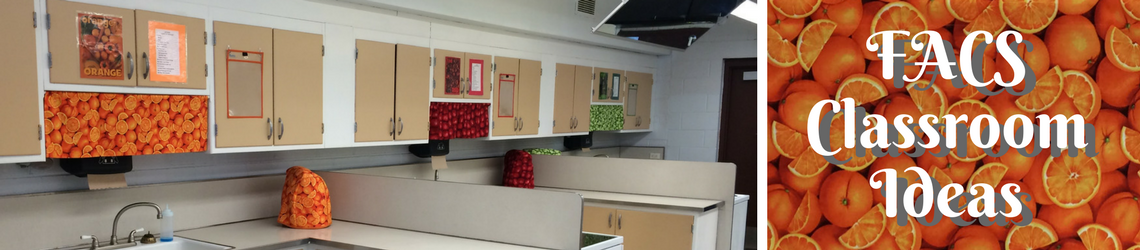
Next, every drawer and door is labeled with its contents, and the labels are framed with that kitchen’s color. Not only do the labels aid the color coding-system, they fantastically cut down on “Where is?!” “I can’t find?!” “What drawer?!” etc.
Labels before...
One kitchen drawer
Cabinets with "extras" that don't need to be in kitchens are labeled in red.
The "purple" kitchen
Every kitchen has a “Clean Checklist” for cooking labs (more on those later), and each is framed in that kitchen’s color.
To add a little decorative touch, where possible I hung valances above the sinks using a tension rod and fabric of a corresponding color. Really cheers up the place, too!
With leftover fabric I put together some matching oven mitts.
Whenever that elusive grant money actually comes through, I order some big ticket items for the kitchens – the first order I have placed after starting at two of my schools were KitchenAid stand mixers… in colors that match the kitchens, of course!
Once the stand mixers are in place, I whip up some stand mixer covers in the right colors (not coincidentally, the fabric will match the curtains and the oven mitts!).
Despite all of this, some people still will not get it. Every once in a while a student or a teacher will return a borrowed item, and when I tell them “You can just leave it in the sink of the orange kitchen” they will ask “Which one is that?” Not kidding.
Equipment
Color-code your kitchen utensils, and no kid can say “that dirty spatula isn’t ours!” when they are in the “Green” kitchen and the spatula itself is a bright green.
Note the pencil box: I have one in each kitchen that holds the can opener and peelers
(two items kids seem to spend inordinate amounts of time searching for), as well as
a pair of child's safety scissors for opening packages, etc.
Many schools that color-code their kitchens do so by placing a paint dot on each piece of equipment that belongs to the corresponding kitchen. This is a good start, but I prefer to be a bit more obvious and search for equipment that actually comes in that color. This makes identification much quicker and easier, and the equipment itself typically looks nicer and more attractive to the students.
Usually every summer WalMart puts out sets of measuring cups, spatulas, slotted spoons, etc in various colors. The summer before I began teaching at my current school, the colors WalMart had out were blue, green, orange, and purple – thus, those are the colors of my current kitchens.
Luckily, Rachael Ray also helps out in this department with cookware! Three years in I was able to order colored cookware: blue, orange, and green from RR, purple from the Paula Deen line.
Always, always put the kids in charge of
washing the new dishes!
Not entirely sure why the scissors are out here...
The orange is my personal favorite.
They even look great in the cabinets!
The kids really get into this after a while. Whenever I bring in a new item I have found (colored grater, peeler, pastry brush, etc) they get pretty excited - "That's purple! That's for OUR kitchen!"


.JPG)


.jpg)


.JPG)


.JPG)
.JPG)
.JPG)

.JPG)
.JPG)
.jpg)


.JPG)